RAIL ROAD PAGE saved to Sony Flash 08.30.10
F.W. & B. R.R Guidelines. Update 07.11.10 / 01.08.11 Backup 06.26.10 cf-NS Sony computer page #1
Model railroading can be an expensive and time consuming pastime. Many skills needed in real life applications can be learned in model railroading. This can be history, geology, mechanics, electrical and structural designing/construction/application, painting, along with creativity and manual dexterity.
A model railroader can learn to imaganeer projects for building or repair and failure is not as catastrophic!
N-Scale requires much less space and can be as reliable as HO scale. N-Scale does require a higher degree of manual dexterity and steadiness than the larger scales.
Being prototypical in rolling stock, names, era, and place can be restrictive BUT it can be more rewarding. The F.W. & B. is not restrictive but prefers the mid 1950s Steam era through the first use of the SD-40-Ts on the Rio Grande. For several years during the 1970s the FW&B operated flawlessly but not the owner (grin) or operators.
FW&B Theory
The Fort Worth & Brazos and the Brazos & Texas Rail Roads model a corridor Ft. Worth to Denver similar to the Ft. Worth & Denver. This includes motive power of the rail roads that parallel or cross the FW&D. These include MKT, SL&SF, QA&P, AT&SF, CRI&P, T&P, MP, D&RGW, UP,
FW&B Hall of Fame
O.S. Lattimore: master switcher. Cliff Robinson: Inspiration. Bill Padgett: brass builder. Jim Finley: Hallmark Brass. Lynn Westscott: communication MR magazine. Ronnie Bob Whitaker: computer. Bill Tarver: Painter.
Doris Schrepel: dispatcher.
Longest trains, 115 freight train with 8 SD-7 locomotives, 26 car passenger train.
Magazine Article: Sept 1973 NMRA Bulletin.
FW&B OPERATING GUIDELINES.
Much of the following nomenclature and guide-lines can be traced to prototype use.
No Smoking. Please keep useless profanity in your head. No pets or screaming babies.
No alcoholic beverages to be served to tea totalers Cell phones etc. should be used outside the train room.
Those providing the best food and drink for the group may choose the best operating positions.
The youngest and thinnest operator will take care of the under lay-out and pop-up duties (tunnel rats). The duties include cleaning track and retrieving stalled and/or derailed rolling stock. To be safe, please dont handle things in the train room un-necessarily. If you didnt touch it you didnt break it!
Food and Drinks must not be held over or set on the lay-out, control panels and computer. Its easier to clean the rug!
Long sleeve shirts can cause damage to the lay-out. Be slow and precise when reaching over the lay-out.
Train Operation Etiquette.
No train operation between 11:59PM and 11:59AM
Rolling stock in the yard and in Town-Sites are hopefully in position for the next operating session, please do not move them.
Hand uncoupling is forbidden unless there is a system failure.
Use great care when re railing rolling stock with a re railing ramp. The brass (glad hand) on the Micro-Train couplers can dig into the track ties and break the coupler. Re-railing cars is easier on uncoupling ramps.
Do not pick up cars or locomotives unnecessarily or by the shell or brake blister, Some of the under frames can fall out. Tilt the rolling stock 30 degrees and support the truck frames. The shells on a few locomotives are not fastened on. Articulated locomotives are very difficult to re-rail!
Do not push buttons down then slide you finger off to the side. The bottom of the button can break off and the assembly will have to be replaced.
Do not repeatedly push turn-out control buttons. This can cause the solenoid to burn out. If you brought a new switch machine with you and your soldering tools,,, go for it!
If a freight car derails with out uncoupling, except in tunnels, continue at reduced speed and over the next turn-out only if it is a trailing point movement and no other trains are in the area.
All mainline trains must stop when a derailment happens on another mainline.
When leaning over the lay-out protect the turn-out machine control buttons to prevent coil burnouts.
Run all main line trains with a proper tail car. We will notice sooner that cars are lost or derailed in a tunnel.
Long trains of 15 cars or more should not be backed up in a tunnel. Articulated UP locomotives should not be backed while coupled to a train. Sudden stops, starts, speed changes can derail trains. Page 2
Make sure your train has the next control block before advancing. Contact the dispatcher before departing a switching site or using the main line.
If a locomotive does not run when the speed control is operated check: the direction toggle switch, the on/off switch, the pulse/momentum switch, the block rotator, turn-out routes/electric solenoids, master lay-out power switch, dirty track, rail joiners, and for bad wiring.
When locked in electrically on a passing siding do not foul or activate the mainline turnouts. Some pass turn-out controllers can switch block control to some other power pack!
The Loop turn-out at Guano and the wye tail track turn-out at Lattimore reverse the polarity for the diverging route selected.
When leaving a power pack move the reverse switch in neutral position.
When train operations are completed please turn off master switch under North Brazos.
Train speed control:
An N-Scale mile is 33 feet. 60 mph is a mile a minute. 9 feet in 15 seconds is a very fast mainline speed. It is 9 feet from the upper tunnel portal of White Mountain, past Robinson to the curve at Lattimore. It is 9 feet from Whitaker to the upper tunnel portal at Mesa Hill.
When entering sidings, the Back Cross-Over or the Yards speed must be very slow.
Very high speed may be used when breaking in Locomotives or track cleaning.
The directional toggle switches on the power packs have a center off position, please toggle between positions (forward-reverse) slowly. When game switching and running very slowly operators may reverse directions without fully stopping. Some locomotives have flywheels and some have barrel gears that can be damaged.
Some power packs have the option of using electronic flywheels and momentum brakes, use with care.
READING REPORTING MARKS ON FW&B FREIGHT CARS
There are two freight car identification codes used on the FW&B. The old code involves two groups of letters. The first group of letters (max 4) in both codes is the railroad name (like UP or ATSF).The second group, of the old code, identify the type and color of the car. The new code involves the use of two groups the first group is the same as the old code but uses the last two numbers on the car in the middle of the second group. The new code will sometimes have the two numbers on each end of the car
Example
T&BV -B32T = Trinity & Brazos Valley - Boxcar 40 #32 Tuscan color , or
BT&W -A42R = Brazos Texas & Western - Automobile Car 50 #42 Red . Note: the color of a multi colored car will be the upper half of the side.
Old Code, group two, letters involve:
#1. The first of three letters. What the car is made of or style of construction , Example
W = wood, S = steel, O = outside braced,
Note; Numbers (1-2-3) have been used indicating the domes on tank cars.
#2. The second of three. Type of freight car, Example
A = 50 boxcar, B = 40 boxcar, C = center flow F = flat car, G = gondola, H = hopper, R = reefer, S = stock car,
T = tank car, FWB-2TX = Fleabite Wrank & Bugtussel 2 DOME TANK BLACK
#3. The third of the three letters are the color, Example
B = blue, G = Green, R = red, S = silver or gray T = tuscan, (from mineral brown to not quite red) W = white,
X = black, Y = yellow,
New Code, group two, letters involve: Example
#1First,
A = 50 boxcar, B = 40 boxcar, F = flat car, G = gondola, H = hopper, R = reefer, S = stock car, T = tank car,
LAST (after the two numbers), Example
B = blue, G = Green, R = red, S = silver or gray T = tuscan, (from mineral brown to not quite red) W = white,
X = black, Y = yellow, Z = invisible
Tips for FW&B nomenclature. Many are typical in prototype operation. page 3
Back cross over: A track so that trains on block 3 (Lattimore) can move to block 7 or 10. This track has an on-off switch on the Dispatcher panel. Block power is controlled by one of the next two north bound turnouts.
Barrel gear: A large concave wheel with gear teeth cut into the inter periphery. Used as reduction gearing for electric motors. Found in Rapido Jeeps and Con Cor PA-1s.
Blind Drivers: Wheels without flanges allowing long frame locomotives to operate on tight curves.
Block: An area of track where the electric power is individually controlled and the in put can be changed from one power pack to another. Areas of track that are separately signaled for the safe operation of rolling stock.
Blue Flag: A marked area (blue map pin) of track not to be entered. A men working warning.
Brake end: The end of a freight car with a hand brake wheel. The brake piston points to the brake end.
Bull-board operation: Where steel boards are placed between parallel freight cars at a loading dock.
Cab: 1. Power pack. 2. Crew compartment on locomotives. 3. Caboose.
Common Rail wiring: See Gap.
Dead Head: When non operating train crews are moved between terminals. Noted when two or more Way-cars (caboose, crummie, or hack) are seen at the rear of one train.
Delay, Delayed action, Double Delayed action: A functional trick of Micro-Train couplers used in game switching. Un coupled cars while still on the ramp will not re couple on the ramp and are in delayed mode when pushed off the ramp. To re-couple from the delay feature the couplers must be pulled apart and rejoined.
Double Header: Two locomotives with Engine Crews pulling a train. See Helper.
Draw Bar: 1. A coupling link between rolling stock or locomotives and tenders. 2. The part connecting the coupler knuckle to the coupler pocket.
Dummy or Slug: An un-powered locomotive. Real Slugs have electric power trucks but no engine or engineer and are powered by a host locomotive.
Electronic flywheel: Even at full power supply the electric currant from the speed control is delivered to the locomotive very slowly to simulate the start of a real train. Available on Pac 4 and 5
Facing point movement: When rolling stock is entering a turn-out facing the sharp end of the points. The opposite of trailing point movement.
Flywheel: A cylindrical weight mounted at one or both ends of an electric motor. They add a small amount of after-run when motors stop receiving current and locomotives run with more dependability on dirty track.
Flywheel effect: see Electronic flywheel: An electric circuit in power packs imitating flywheels in locomotives.
Frog: The slotted rail crossing in the middle of a turn-out.
Gap, double gap: A non conducting electrical gap in a rail for control blocks used in common rail blocking systems.. Double gap (both rails) is used for reverse loop wiring. The FW&B uses the Engineers side rail on north bound trains as the block control and the other rail is common ground.
Glad-hand: A coupling in brake air lines between cars on the prototypes. In models the brass pin in Kadee (Micro-Train) couplers.
Guard Rail: An extra rail mounted on each side of a turn-out frog that help prevent derailments.
Helper: Locomotives added to the front or rear of a train to help climb a grade. See Double Header.
LaBelle Oil: 108 A thin penetrating oil that has anti-oxidizing ingredients, plastic compatible and aids electrical conductivity. 102 A thrixatropic gear oil
Lash up: Two or more locomotive used together and each one known as a unit or A, B, C, D, (on the FW&D) or L, A, B, C, (on the AT&SF). Until 1959 four diesel units or less would be considered a locomotive and each locomotive would have an Engineer and Fireman.
Locked in: see Track and Time: A train is only given power to one local block like a passing siding (parallel track to a mainline) and usually a town (switching site). When trains are locked in they must not foul the main line. Contact the dispatcher before departing a switching site. Sometimes known as track & time.
Momentum brakes: An electronic flywheel method of stopping or slowing a train simulating the action of the Westinghouse air-brake system. Available on Pac 4 and 5
Momentum throttle: see Electronic flywheel: see Flywheel effect: Available on Pac 4 and 5
Points: Point Rail: The sharp, moveable rails in a turn-out.
Pull Over: In a curve sudden acceleration or excessive drawbar effort can cause many cars to derail to the inside of the curve.
Reverse Loop: Electrical polarity (positive and negative) are switched (reversed) in the rails. An electrical reversal to the motor in a locomotive. There are four track plan types. A loop, A turn table, A wye, A cross-over between parallel tracks going in opposite directions. Page 4
Reverse Switch: A three position paddle toggle center-off switch on power packs used to reverse (electrical polarity) the direction of locomotives. Forward direction for north bound locomotives the paddle will be leaning to the right on the power pack.
Run Around: A method of moving rolling stock from behind a locomotive to the front.
Run Through: 1. A main line train that passes through a yard without stopping. 2. A trailing point movement through a turn-out not properly aligned. See facing point movement,
Slack: The distance or amount of play between two cars. When the locomotive is pulling the slack runs out (train is stretched) and the train is longer. As the locomotive slows or stops the slack runs in making the train shorter.
Slack Action: When the slack is in on long trains the train can be started one car at a time. With long trains the slack action can be violet enough to derail some cars! The application of engine (locomotive) brakes will cause slack to run in. The application of train brakes will cause the slack to run out because the brakes are set on the last cars first.
Reverse Loop Slave unit: A turn-out machine or electrical relay that reverses track polarity. These are the Guano loop turn-out, the main to main cross-over at Tarver and the tail track wye turn-out at Lattimore.
Spring Switch: A turn-out that the points are lightly locked in one direction or the other allowing limited run though trailing point movement without derailments.
Spur: A branch line thats returns on the same track that it left the mainline on.
Switch: 1. A misnomer for the description of a turn-out (track switch). 2. Electrical devices controlling the flow of current.
Switching: Changing positions (switching) of rolling stock in a train or town site.
Switch List: A card that train operators use describing the Towns and industries that freight cars are to be picked up or delivered to.
The Slave Block: Located in the lower Mesa tunnel portal. Receives power of the Whitaker or North Yard blocks from the turn-out control buttons of that (Whitaker - North Yard) turn-out.
Sub Slave Blocks: The inbound turn-out for northbound trains connects the Block power to the pass siding at most switching sites.
Tail track: Usually a dead end track (stub) on a wye or control block.
Throw bar: A moveable connection between the turn-out points and the activating device.
Track and Time: Trains locked in to switching sites must ask and receive Dispatcher permission to use the main line.
Uncoupling Ramp: A magnet placed between the rails.
Vision car: A freight car installed in front of a way-car (caboose, crummy, hack) that allow a better view of the train by the rear crew. These would be flat cars, gondolas, and tank cars.
Way Freight or Road Local Trains: Trains that do switching at sites/towns along the main line.
Worm and Spur gear: A method of transferring electric motor power to the drive wheels of locomotives. Worm gears are spiral cut inline. Spur gears are a flat wheel with teeth cut or molded around the periphery. Motor end frame thrust bearings are under extra strain with worm gears fastened directly to the armature shafts.
Tips for FW&B Dispatchers.
The Dispatcher controls the block system and operates (switches in) the normally inbound North Yard. The panel has ten double wafer rotor switches controlling each of the electrical blocks. Nine power packs are wired to each of the inside wafer of the rotor and the top center position is off. The passing sidings (when locked in) are controlled by the nearest pack to them. When trains are locked in they must not foul the main line. Trains normally leave the South Yard as North Bound and terminate at the North Yard.
A. BAIRD: Pack 2, Retractable main line ramp. A mainline operation only.
B. BRAZOS: Pack 6 (locked in).
C. Power for the back cross-over slave track is powered/controlled by the North Yard-Whitaker turn-out.
D, DISPATCHER-NORTH YARD: Pack 1.
E, The Engine facility and Roundhouse are operated by pack 4 only.
G. GUANO: Pack 2 (locked in).Trains bound for Guano must use the front cross-over or be South Bound out of the North Yard. The front cross-over between main lines (at Tarver) is a reverse loop.
The loop turn-out controls the reverse loop. The double gap is at the Robinson power block.
L, LATTIMORE: Pack 5 (locked in). page 5
Trains leaving South Yard bound for Lattimore need to be on Pack 5.
The east end main-pass turn-out protects main line. If this turn-out is thrown to the pass the power to the main line is turned off. Tail track of the wye turn-out is an automatic reverse loop direction control.
O. OUT SIDE MAIN,OSM, is the COLORADO DIVISION: Pack 9 (out of service) Normally entered as north bound on the west leg of the Lattimore wye. North bounds return via the Hole in the Wall near Guano.
N. NORTH BRAZOS: Pack 8 (locked in).
R. ROBERTSON: Pack 7 (locked in).
S. Service area for locomotives and the roundhouse is controlled by pack 4 only.
T. TARVER (Salome): Pack 3 (locked in ). Retractable ramps. The front cross-over between main lines is a reverse loop.
W. WHITAKER (Brisco): Pack 3.. A mainline operation only.
Y. YARD: NORTH Pack 1 The north yard/mainline turn-out relay is in the out position for the yard, SOUTH Pack 4
Tips for lay-out and track design. Dioramas
Think modular. The lay-out may need to be moved, modified, or added to. Design the ends so they might be re used in another expanded design.
Think about the use of removable scenic diorama inserts with track on the lay-out track plan.
Many rail sizes are available. Code 70 is standard. Code 55 or 40 looks better but will require reworking some wheel flanges. Any rail use smaller than code 55 may show that one may have flagellant tendencies.
The depth in the turn-out frogs using less than code 70 rail may cause problems with the older wheel flanges.
Some brands of nickel-silver rail oxidize faster than others. In the old days Kato, Markin and Peco were not as good as Atlas. Rapido round top steel rail was black anodized with a rough surface that aided traction. Rapido track also helped keep wheels clean but would rust after wearing through the anodizing.
Design the lay-out for # 4 turn-outs in yards and # 6 turn-outs on main lines, avoiding wye and curved turn-outs.
Avoid designing a main line run with turn-outs causing an S curve. Use a turn-out as part of the design curve
Trains do not operate well on lay-outs with tight radii and steep grades. Multi level lay-outs are more exciting.
Designs with long runs in tunnels create several extra problems.
Double track main lines depict big name railroads and extend the possibilities for a long single track run.
Do not super elevate curves. Its good for looks but causes rolling stock pull overs.
There are some brass locomotives that will not operate on 12 radius curves and require18 radius curves.
Parallel straight track can be laid on one inch centers but not in curves. Inch and a quarter or with a three point HO track gauge.
Plan ahead for complex switching (game switching) and where the uncoupling ramps will be. The length of dead end industrial tracks (when game switching) is critical to switching problems.
Plan ahead for removable access maintenance hatches.
Plan the for the grade required for a train to curve around over its self thinking of the tallest rolling stock as clearance.
Thin strips (.030 metal) laid in notched cork sub roadbed (a bridge without cork or sub roadbed) can reduce the grade required for a train to curve around over its self.
Up hill grades over a ¼ inch per foot and curves of less than 12 inch radius severely limit train length.
Tips for Construction.
The L- girder system may not lend its self to light weight modular construction.
Homasote (fiberboard) is a very good material for use under flex track and is good for sound deadening.
Sheetrock screws in wood frames make remodeling or corrections easier. Screwing and gluing frame parts can reduce flexing and make the lay-out stronger.
Hollow core doors are nice and can be trimmed to store under a bed or hung on the wall like a picture.
Use a plug (Cinch-Jones ) in system so power supplies and control panels can be removed from the lay-out.
2 x 2 or 2 x 4 legs can be drilled vertically in the bottom and long 3/8th inch bolts installed with adjusting nuts for leveling the lay-out.
Tips for laying flex track. page 6
Many recommend using cork or Homasote for roadbed. In areas of double track do not use the bevel edges of the cork between track as it is a problem when ballasting the double track.
Pre-drill holes for track nails so you dont destroy the track if you have to move it. Buy extra drill bits. Learn to sharpen them.
Removing the track nails reduces noise transmitted to the lay-out.
The FW&B does not use cork or other roadbed under large yards or town-site track. Shingle scrap or other filler methods can be used to taper off the cork.
Pre paint the cork or other roadbed the ballast color. When paint is dry put a light coat of thinned detergent on the paint or sub roadbed.
If retractable or electrical ramps are to be used cut through the lay-out before the track is fixed permanently.
Chemical darkening agents or painting of the rail can cause problems later.
Cross sections of rail vary from brand to brand requiring occasional rail-joiner modification.
When cutting rail be sure to deburr and radius the cuts. Use diagonal cutters vertical to the rail then deburr and chamfer the top, end and bottom of the cut. This will be beneficial later when cleaning the track.
When joining flex track in curves pre-bend the tip of the ends about an inch to match (very slight bend) the radius to prevent an uneven radius.
When laying a turn-out fix the adjoining rails so the joiners can be slipped all the way back where the turn-out can be removed later. Do this at the point end of the turn-out. Be careful not to glue these rail joiners when ballasting the track.
Sharpened rail-heads in curves can help clean wheels loaded with crud. Rail must be removed from the ties. Some types of flex track have rails that can be removed and replaced.
Use as few track nails as necessary. Pre-drill undersized holes for track nails. After ballasting pull as many a you can. Waxing the nails before installing might help. This will be beneficial later when cleaning the track.
Atlas snap track re-railers as road crossing are nice and using them in tunnel could be helpful. Uncoupling ramps can be hidden in re-railers.
It is possible to cut and soldier two flex tracks together, bend around an old tire of the chosen radius and make the curve permanent with super glue.
Always curve flex track with the more ridged rail to the inside of the curve. Turn the track over to see the gaps in the plastic ties. Less gaps = more ridged.
One foot lengths of electrical feeder wire can be soldiered before or after laying the track. It requires a little more skill after!
Rail gaps for electrically blocking need to be more than a razor-saw wide due to expansion and contraction. Using glue in the gaps can help but expansion can crack it out of the gap.
Do not soldier all rail joints. Maybe every other. The rails expand and contract at a different rates than the other materials.
Old or freshly laid track should be cleaned. Heavy duty cleaning would be: vacuum, polish with 600 wet/dry sandpaper or rubber eraser, vacuum again then apply a thin coat of LaBelle 108 oil.
The length dead end industrial tracks (when game switching) is critical to switching problems.
Bumpers on dead end tracks should strike the poling pocket of the freight cars and cause fewer derailments. Bumpers can be cushioned with scenic foam or moss.
The outer rail in a tight radius curve can be repositioned (re-gauged) .015 wider allowing longer frame locomotives to run on tight radius curves.
Tips for laying turn-outs.
There are several types of turn-outs: Locking and non locking points, Open and closed frogs, Electrically conducting and non conducting, and the turn-out length.
Non locking turn-outs can be connected to machines with light gauge crank wire as spring switches and be somewhat forgiving on trailing point movements.
Removable turn-outs similar to HO True Scale HiSpeed can be homemade on wooden roadbed and pre ballasted. This was done successfully on the old T & B V N-Scale RR.
It may be possible to work a ballast colored clay putty into turn-out ties to simulate the ballast.
Number 6 turn-outs should be used on main line and number 4 turn-outs to save space in low speed areas.
Guard rail clearance between and stock rails should be .035 to.040 and not higher than the stock rail.
Be sure to deburr / radius guard rails.
Manual control of turn-outs can be done with HO flop-overs, bell cranks with rods, and hydraulically with syringes and flex-tubing. Some Peco turn-outs are self locking. Place switch motors for easy access.
One electrical switch machine solenoid can activate more than page 7
one turn-out like all four in a scissor cross over
Controllers for the switch machine can activate more than one.
Switch machines can be installed at a distance (for better access) from the turn-out by using a small rod in a tube (be sure to lube the tube). The Switch machine can be hidden by removable scenery or a model building.
If a turn-out is not available while laying track put a scrap flex-track piece cut to length in its place. Fix the adjoining rails (point rail end) so the joiners can be slipped all the way back where the turn-out can be un-installed later.
Rail Joiners can be shortened.
Tips for wiring the lay-out.
Wiping electrical contacts work more dependably than touching contacts.
Keep a color coded wire diagram as the wiring is being done and show all later modifications. Make a computer diagram as you progress. Never change wire colors in one application.
See Tips for laying turn-outs for wiring them.
Old standard power packs are, basically sad, a 12 volt transformer putting out 12 volts full time with a rheostat that burn off the voltage that you dont want the train to have. The rheostat goes from wide open (full throttle) to about 115 olms (very slow or stopped)(hopefully) then off. It has a rectifier for DC output and a double pole, double throw direction switch. These packs un-desirable. SCR and variable transformers are much better.
Some N-Scale locomotives need more olms resistance in the old style power packs. It takes less power to run N-Scale than HO. Locomotives.
If jack rabbit starts are a problem a resistor cam be added to the output of the power pack.
Using two strands of scrap phone wire per function is viable.
If locomotive jack rabbit starts are a problem a resistor cam be added to the output of the power pack.
When wiring through a hollow core door drill a hole all the way through, poke a small tube or straw in it then poke the wire in the tube then pull both through the door.
The wiring at the bottom of a hollow core door can be thumb-tacked to the bottom and protected by fastening cardboard with small screws. Ultra thin flat wire is available for doll houses or cut from sheet on paper cutter.
A 12 volt light bulb with a variable resistor in parallel inserted into a rail feed wire can 1. Slow the train speed in a given area. 2. The bulb can be used as a signal.
Heat sinks are need in some lighted plastic structures to prevent melting.
Tips for ballasting track.
Ballasting turn-outs and sliding rail joiners creates problems later.
Removable turn-outs like HO True Scale HiSpeed can be homemade on wooden roadbed and pre ballasted.
It may be possible to work a ballast colored clay putty into turn-out ties to simulate the ballast.
Pre-fill gaps with putty.
Pre soak and dry Cambells (check other brands for metal particles with a magnet) ballast with liquid detergent( not bio degradable)½ oz to a pint. Thin Elmers Glue to ¾ water and add a few drips of detergent. Pre wet and dry ties with detergent ½ oz to a pint water. Note! Detergent is an electrical insulator.
Pour and smooth dry ballast onto track
The inside top edge of the rail is where the wheels gather the electrical currant and must be clean!
The glue in a large syringe, work down the track putting one drop of glue in the middle of each tie. As the glue soaks in go back and work down the track adding another drop. Do this until the ballast is saturated. Try to keep glue off of rails and turn-out points! Allow 24 hours or more to dry.
Tips for cleaning track.
Most wheels only run on the inside edge of the rails. Powered wheels tend to grind and leave particles. Non powered wheels tend to pick up particles. Particles can be contain bits of track, wheels, dust, oil and dandruff. Special rubber erasers, dry shop towels and shop towels with small amounts of LaBelle 108 oil are some of the methods used for cleaning. Vacuum to remove rubber a lint after cleaning. The LaBelle oil reduces non conducting oxidization on rail tops. To increase traction in small areas cross-grain dry sand with 600 wet or dry sandpaper.
Tips Scenery: Page 8
Hydro-cal is difficult to use but very strong when used as hard-shell and does not shrink, Plaster is too weak for hard-shell work. Sculpa-mold is easy to use and light weight but shrinks, all three can be tinted with acrylic paint.
It is possible to use a removable second layer of scenery to change the flavor of the lay-out. Deluted layers of Elmers glue will remain slightly flexible when dry. Small rocks and colored foam can be glued to a colored cloth and rolled up when not in use.
A block long row of buildings can be mounted to eighth inch plywood or balsa sheet disguised to look like curbing and sidewalk for easy removal.
Tips - odd.
LaBelle 108 oil slows the oxidizing, is plastic compatible and is our friend! Oiling the track will reduce traction the first few trips over the area. Frequent dry wiping of the rail tops will with a shop towel will help prevent crud build-up on non powered wheels. The dry wiping also aids locomotive traction. Vacuum often to remove cloth fibers, hair and dust from collecting in wheel axles and gears. Dust capturing devises help the track stay clean.
Some power packs have a green indicator light. If a running locomotive comes to an unintended stop quickly check the indicator light! If the light is off it indicates an electrical short so turn the pack off quickly! If the light got brighter it indicates the locomotive has lost contact with the power pack. If the light fluctuates in brightness it is indicating dirty track.
Tall items like telephone poles, signals and building near the track and between the operator and right of way will receive damage while cleaning the rails and cleaning up derailments.
Save wheel sets with hot (one wheel insulated) axles they might be needed later.
Lead weight adds more traction to locomotives than decoders.
The old, ugly, with added weight Rapido GP-7s are one of the best short all wheel drive and all wheels collect currant for switching. Do not lash up more than two Rapido GP-7s or GP-30s.
The tread width of some Rapido locomotive wheels are too wide and will short out on turn-out frogs.
There are four electrical track designs for reverse loops. The F.W. & B. has them all.
In the 1970s I designed and help build an N-Scale lay-out with a main line that was 561 feet (17 scale miles) in length. The electrical loss in 561 feet was barely noticeable. A locomotive run test was done to check for non conducting rail joiners. It takes two rail joiners in one rail not conducting in a circle of track with one pair of feed wires to stop the locomotive.
Magnets mounted under cars and locomotives can activate Radio Shack magnetic reed switches imbedded in the ties. These switches can control many types of electrical devices.
When setting up long trains put the lightest, best rolling cars in the rear.
Tips on couplers.
There are several types on mounting pockets for Micro Train (Kadee) couplers. All are spring loaded, some springs cushion when pulling the others when pushing. The cushion when pushing are the ones with short pocket. When pushing these short ones the knuckles can move up and down so the height and brass glad-hand setting is critical.
The Delrin plastic that Micro train couplers are manufactured with can loose the slick surfaces on the knuckles and the draw-bar into the coupler pocket. Thus the knuckles do not open when bumped together and the coupler does not move to the right side when the brass glad-hand moves over the magnetic ramp.
A Rapido coupler can be trimmed into a double T shank and be installed between diesel units for close coupling. The T shank can be cut slightly smaller so it will unhook when rotated 90 degrees. The T of the
shank can be cut off and the Rapido coupler glued onto the coupler pocket.
Trains equipped with micro-train couplers running over track with uncoupling ramps should have a tail car with a drag spring installed between the truck frame and axle.
Micro-train uncoupling ramps can be broken into several pieces making short ramps. To break place an 1/8th inch drill rod cross the ramp and squeeze with a C-clamp. Chamfer the broken edge.
The glad-hand brass in the Micro-Train couplers have a burr at the point nearest the track . Deburr and chamfer to reduce derailing problems.
Micro-train couplers on switching (local way freight) cars should have a rail-head / ramp clearance of .005 to .010. Through freight service cars should be .015 to .020. Measure this clearance over a ramp with slight down pressure on the coupler. Make sure the coupler moves to the delay position when pushed over the ramp.
M-T couplers can be uncoupled by tilting one car 45 degrees and moving it back and forth. page 9
My experience with M-T electric un-coupler ramps in the 1970s was not good so I installed retractable ramps.
Coupler Conversion
SD-60 Atlas MT-#1015/1016
Tips on Locomotive Oiling & Repairs
Note: Locomotive motors will squeal when end fame bearings are dry. LaBelle 108 or Wahl clipper oil is recommended. Very small syringes aid applying the 108 oil to all bearing areas. Use LaBelle 102 on worm and gear teeth. Some wheel sets are insulated on one side and will short out if not reinstalled correctly in the truck frame. Some motors can be installed upside down which causes (electrical polarity) the locomotive to run in the opposite direction.
Kato SD-7 and most Kato diesels.
Oiling, Total disassembly may not be required. Pop out hand railings at cab, pry hood & cab shell off railings-catwalk. Note closely the position of the copper flat-wires between trucks and bottom of frame-halves! Remove fuel tank cover, Loosen plastic screws holding frame-halves (the trucks will fall out at this point) enough to get small oilier needle to shaft between flywheels and motor end frame. Use very small amounts of 108 oil! Oil each of the worm-gear bearings (4) with 108 and use 102 on the brass worm. In the trucks use 102 on gear teeth and oil the bearings of the axles and gears with 108. Reassembly: Install trucks and tighten frame-halve screws and reposition copper flat-wires. Put on test track, if OK reassemble shells. Trucks can be disassembled, cleaned and oiled.
Rapido GP-7 and GP-30
Oiling, Total disassembly is required. Remove fuel-tank. Slide truck back from ends and gently twist them off. The motor is soldered to the printed circuit-board. Lift shell off frame. Use care lifting truck holders and metal frame off of circuit-board, motor, barrel and worm gears. Some are modified with moldable lead. Some have added headlight. Trucks are interchangeable between GP-7,GP-30 and FA-1s. The bump in the center of the fuel tank needs to adjust the motor up tight into the frame. The thin clips adjust the spur gear in the truck to the worm gear.
Con Cor PA-1: Second Generation: Frames on the PA-1 is longer than PB-1. The screw threads are very easy to strip. Remove plastic fuel tank cover by spreading the shell and power unit will come out. Remove screws on one side of upper frame, one side has insulation sleeves. One lower half frame is released and the trucks (note copper wiper) fall out. Use a small oilier needle to oil shaft between flywheels and motor end frame. Use very small amounts of oil! Oil each of the worm-gear bearings (4) and brass worm.
Old Steam Locomotives (most): Many shells have a mounting screw in the steam dome. Most engines collect current from one rail and the tenders from the other rail. Clean all wheels axles and electrical wipers and apply thin coat to all but the wheels. Look close at the method of currant transfer between engine and tender.
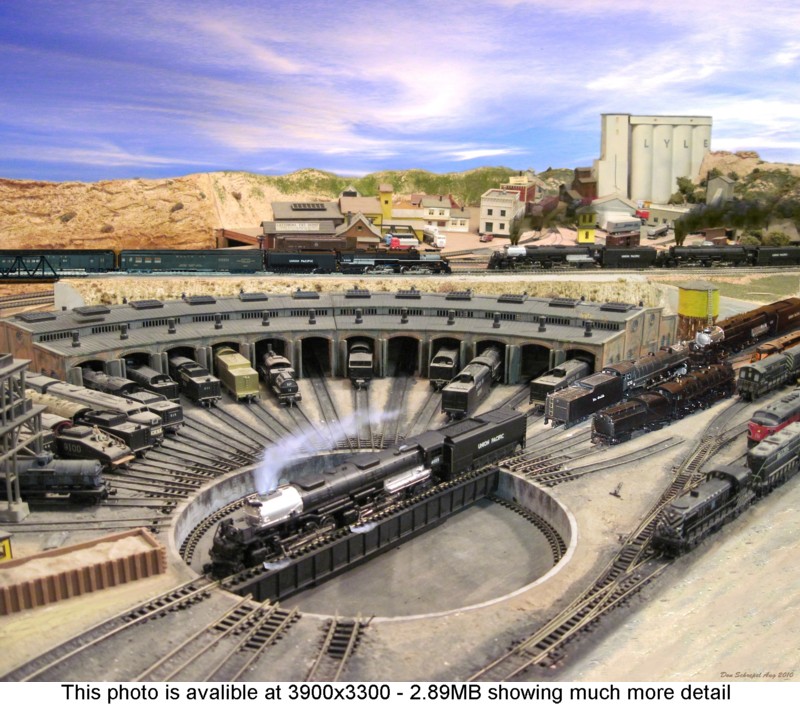
Tips on Roundhouse use:
The Engine Service Facility only operates with Pac 4.
Engine Service track 9 and stalls 2, 3, and 5 are reserved for engines (longer than the Y-6B type) too long to be turned on the turntable.
NEW PROJECTS That would be interesting (LIKE WE NEED MORE?)
1. Helper service system to help trains up Ashley Mountain. This would require a sub-block toggled kill area in Block 2 and Lattimore. Helper engines could be stationed at Brazos or North Brazos.
2. Lay a hidden track from North Brazos and connect it to the hidden track under Lattimore on Block 9. This could serve the same function as the Back Cross-over.
3. Dress up veneer plywood applied the edges of the lay-out.
4. Removable scenic valances to apply to the edges of the lay-out for photo/video opportunities.
5. Paint or install new back-drops.
6. Indirect lighting.
7. Lift out section for the buildings west of Robinson, some in Lattimore and Tarver with plug in lighting.
8. Rework the old automatic signal lights on the lay-out.
9. Insulate, straighten, tag and diagram writing under the lay-out.
10. A kill toggle (on-off) for the passing track at Tarver.
Lay-out description
Section 1 with dispatcher panel has two removable parts. The mesa guano mine is in and the flat piece it sets on.
Section 2 with roundhouse and removable pop-up hatch. Section 3 hinge pinned under Lattimore.
Section 4 with Brazos and Robinson. Section 5 with Lattimore and two small pop-ups

 Active Topics
  Memberlist
  Search
  Topic: Temporary Post